.svg)

Building ELT Pipelines with dbt: A complete hands-on tutorial (2025)


.png)
The shift from traditional ETL (Extract, Transform, Load) pipelines to ELT (Extract, Load, Transform) has been driven by the growing need for real-time data processing and analytics. Traditional batch-based ETL pipelines struggle to handle large volumes of continuously streaming data, which are increasingly non-negotiable for modern analytics use cases. Modern cloud data warehouses have made it feasible to load both structured and unstructured data at scale before transforming it, enabling faster, more flexible, and cost-efficient pipelines. ELT allows transformations to occur on-demand, without being constrained by data volume during extraction or loading. This paradigm not only accelerates insights but also aligns better with the scalability and elasticity of modern data infrastructure.
Modern data stacks increasingly favor the ELT (Extract, Load, Transform) approach, with dbt (data build tool) emerging as the de facto standard for the transformation layer. Widely adopted by analysts and data engineers, dbt is a framework to transform, clean, and aggregate data within your data warehouse. Its unified platform approach streamlines the entire transformation lifecycle by providing a consistent framework for writing, testing, documenting, and deploying SQL transformation logic and integrating version control and CI/CD practices throughout. This eliminates the need to stitch together separate tools for development, testing, and deployment, making it easier for teams to build, manage, and scale reliable data workflows entirely within their cloud based data warehouses.
In this tutorial, we will explore how to build ELT pipelines using dbt by integrating e-commerce data—such as orders, products, and customers—from a PostgreSQL database into Snowflake. We’ll perform data transformations with dbt to create clean, structured datasets suitable for OLAP analytics, such as customer lifetime value, and product performance metrics. Additionally, we’ll demonstrate how to use Matia to generate dbt models automatically after the integration run.
The role of dbt in modern ETL
In the modern data stack, dbt plays a crucial role as the “T” in ELT (Extract, Load, Transform). It simplifies data transformation by replacing complex ETL pipelines with modular, SQL-based workflows that run directly in cloud data warehouses like Snowflake, BigQuery, and Redshift. By leveraging the power of the warehouse’s native compute, dbt delivers scalable, efficient transformations. It enables you to model data, run quality tests, and generate documentation using familiar tools like SQL and Jinja (a lightweight templating language).
Instead of relying on monolithic ETL scripts, dbt encourages a modular approach in which transformations are broken down into reusable SQL models. These models can be created as views, materialized views, or tables without needing to define their structure using DDL upfront. Instead, models are defined, configured, and documented through simple YAML files.
dbt is also a powerful tool for data quality testing and documentation as it integrates built-in data testing as a core part of the transformation workflow. You can define tests directly within your models — such as ensuring uniqueness, non-null constraints, or referential integrity — to validate data integrity at every step of the pipeline. Once transformations are complete, dbt can automatically generate comprehensive documentation for your data models. This includes detailed descriptions of models, columns, and their relationships. Additionally, dbt provides visual lineage graphs that clearly display model dependencies, allowing stakeholders to understand how data flows through the pipeline and assess the impact of any changes.
Matia was built with dbt in mind. When integrated with Matia, dbt’s transformation process is further enhanced. Matia works seamlessly with dbt to enhance your pipeline with rich metadata management, real-time visibility into data tests, schema management and lightweight orchestration capabilities. This integration ensures tight alignment across the entire data lifecycle, from ingestion (ETL) to transformation and reverse ETL. With features like complete visibility into dbt models and their metadata, bi-directional orchestration, and end-to-end data lineage tracking, Matia and dbt together create a robust, scalable, and fully observable transformation workflow that supports reliable analytics and operational efficiency.
Architecture overview: dbt + Matia integration
In this section, we’ll walk through how to integrate your existing dbt project into Matia’s Data Operations framework. This includes connecting your data warehouse, defining configurations, and running dbt models as part of your automated workflows.
For our purposes, we’ll assume dbt is already set up independently. You can find the instructions here.
The modern ELT architecture using Matia and dbt follows this flow:
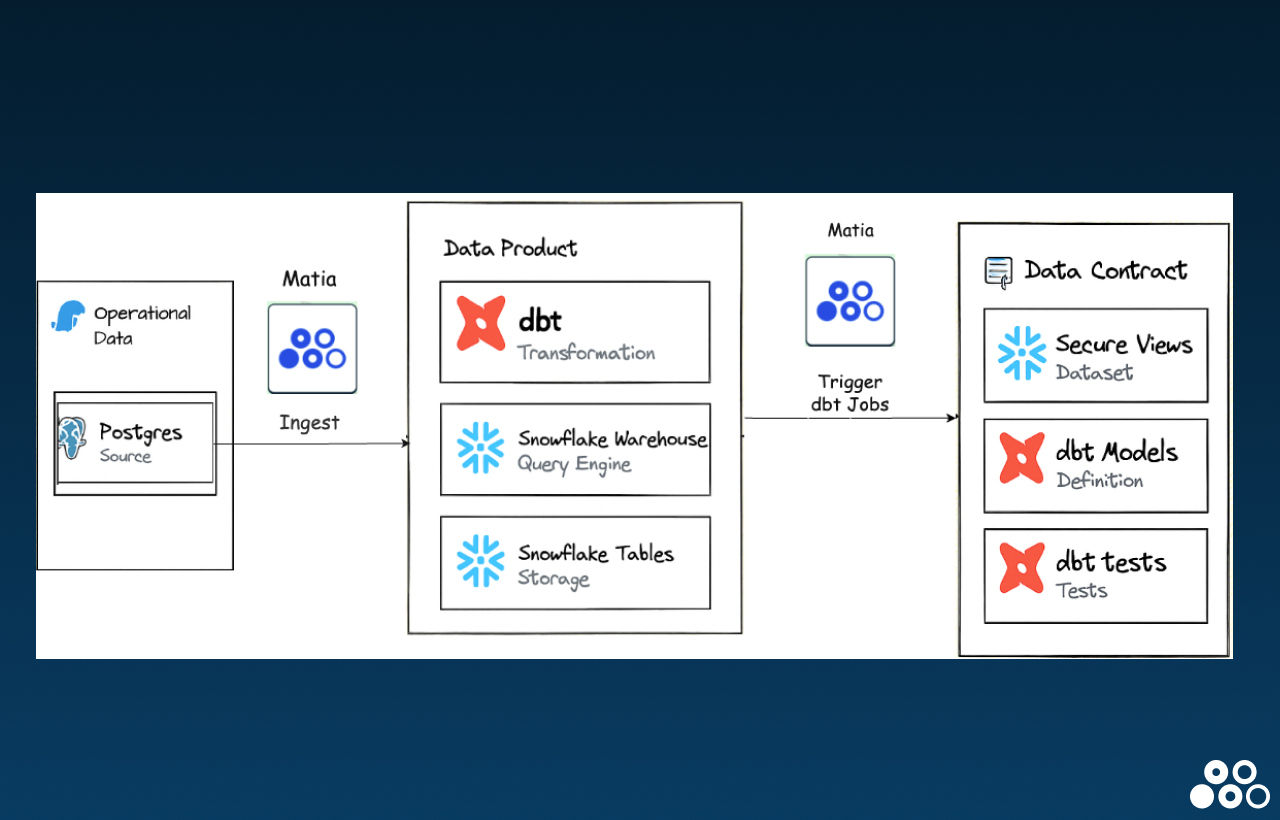
- Configure Postgres as a Source Connector: Set up Postgres in Matia as the source system to begin ingesting raw data.
- Configure Snowflake as your Destination: Instructions in the app will walk you through setting up Snowflake as a destination, whether through the unified setup wizard or leveraging key-pair.
- Run the Integration into Snowflake: Matia loads the ingested data into Snowflake, where it becomes available for transformation.
- Connect dbt to Snowflake: Use dbt Cloud (via Partner Connect or manual setup) to establish a connection to your Snowflake environment and link your Git repository.
- Create dbt Models: Develop modular SQL models in dbt to transform raw data directly within Snowflake. Use ref() to define model dependencies and organize logic.
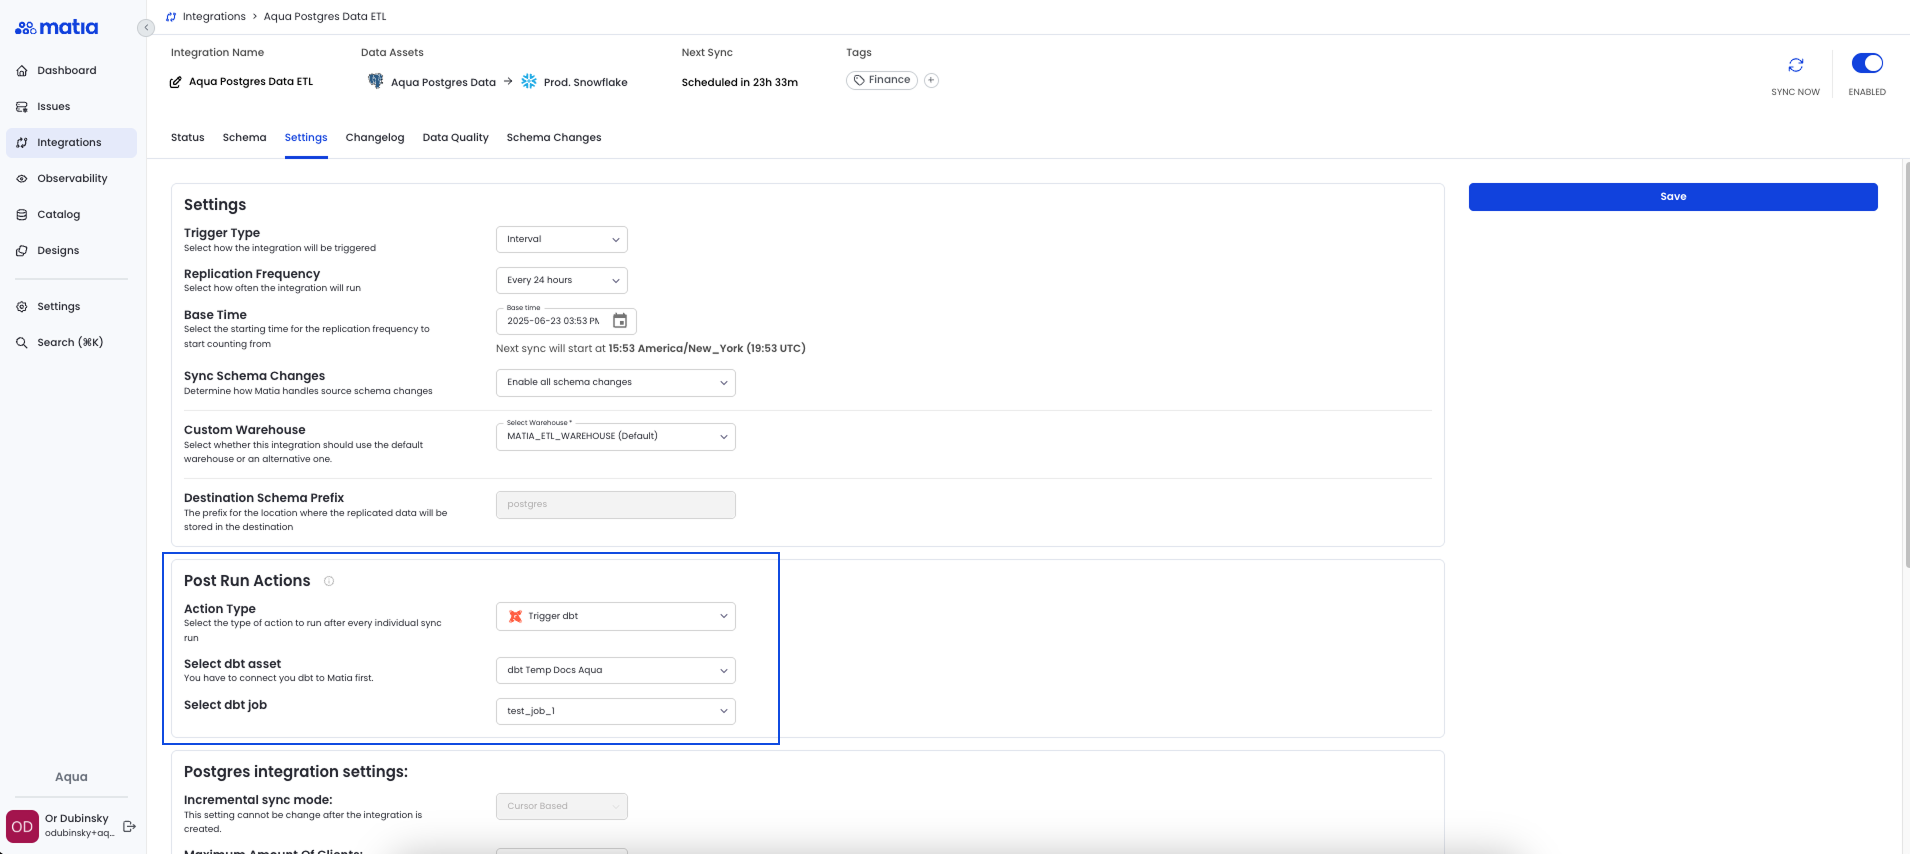
- Trigger dbt Jobs Automatically via Matia: After each ingestion sync is completed, users can configure Matia to automatically trigger the corresponding dbt jobs—ensuring data is transformed, tested, and documented before it's consumed by BI tools or downstream systems.
Setting up your dbt project
Setting up your dbt project is the first step towards building data models using dbt. Here is a step-by-step guide on how to install dbt and configure your project using dbt Core:
Step 1. Install dbt: You can install dbt using the package manager of your choice, such as pip (for Python users) or Homebrew (for Mac users). Detailed installation instructions can be found on the dbt documentation website.
Step 2. Create a dbt project: Once dbt is installed, you can create a new dbt project by running the dbt init command in your terminal.
dbt init dbt_snowflake_projectThis will create a new directory structure for your project, including configuration files and sample models.
Step 3. Configure your project: Next, configure your dbt project to connect to your database. This involves specifying the connection details in the profiles.yml file. You can find examples and detailed instructions on how to configure your project in the dbt documentation.
When you invoke dbt from the command line, dbt parses your dbt_project.yml and obtains the profile name, which dbt needs to connect to your data warehouse.
name: dbt_snowflake_project
version: '1.0'
profile: snowflake_profile

models:
  dbt_snowflake_project:
    example:
       +materialized: view
dbt will search the current working directory for the profiles.yml file and will default to the ~/.dbt/ directory if not found.
Example for Snowflake:
snowflake_profile:
  target: dev
  outputs:
    dev:
      type: snowflake
      account: your_account
      user: your_user
      password: your_password
      role: your_role
      database: your_database
      warehouse: your_warehouse
      schema: your_schema
Step 4. Setting up dbt models: dbt recommends a specific directory structure for organizing your data model files and folders. This typically includes a models directory where you can store your data models, a schema directory to define your schema files and a seeds directory to store data seed files.
Here’s what the dbt models might look like:
#models/stg_orders.sql
SELECT
  id AS order_id,
  customer_id,
  order_date
FROM {{ source('raw', 'orders') }}
Step 5. Build your dbt project: Before deploying, make sure to build your dbt project to ensure that your data models are up-to-date and error-free. To build your project, run the command dbt build in your terminal.
Step 6. Deploy your data models by running the dbt run command in your terminal, which will execute all the SQL statements in your data models (.sql file) and create/update tables in your target database.
Step 7: Monitor performance and usage: After deploying your data models, it is important to monitor their performance and usage to ensure that they are running smoothly and efficiently. dbt provides various features and metrics for monitoring, such as:
- dbt docs - which generates documentation for your data models,
- dbt test - which runs your tests and checks for any issues.
Here is an example of deploying a dbt data model to production:
# Build your dbt project
dbt build

# Deploy your data models
dbt run --target prod

# Monitor performance and usage
dbt docs generate
dbt test --target prod

# Maintenance and updates
git commit -m "Updated data model"
dbt push
dbt run --target prod
Building your ETL pipelines with Matia & dbt: a hands-on tutorial
Pre-requisites for starting this project
- Postgres Aurora Account - Enable logical settings to connect to Matia
- Snowflake Account
- Matia Account (get a free trial here)
- A dbt Cloud account (Team, or Enterprise tier)
- A dbt Core installation with your repository
- Any Python IDE
Step 1: Setup Data Sources in Postgres
Imagine you're building a data pipeline to report on an e-commerce company’s sales performance. The raw data is available in the following format:
- Customers table
- Orders table
- Products table
Our goal is to use dbt to transform this raw data into a Sales Report table that aggregates revenue per product and customer, with historical accuracy and data quality tests.
Once your Postgres Server is set up, we will simulate the ecommerce orders data using the following python script:
import psycopg2
from faker import Faker
import random
from datetime import datetime, timedelta

# --- CONFIGURATION ---
DB_CONFIG = {
    'dbname': <DB_NAME>,
    'user': <USERNAME>,
    'password': <PASSWORD>,
    'Host':<host-address>,
    'port': '5432'
}

NUM_CUSTOMERS = 50
NUM_PRODUCTS = 10
NUM_ORDERS = 200

# --- SETUP ---
fake = Faker()
conn = psycopg2.connect(**DB_CONFIG)
cur = conn.cursor()

# --- TABLE CREATION ---
cur.execute("""
DROP TABLE IF EXISTS orders, products, customers CASCADE;

CREATE TABLE customers (
    customer_id SERIAL PRIMARY KEY,
    full_name TEXT NOT NULL,
    email TEXT UNIQUE NOT NULL,
    created_at TIMESTAMP DEFAULT NOW()
);

CREATE TABLE products (
    product_id SERIAL PRIMARY KEY,
    name TEXT NOT NULL,
    category TEXT,
    price NUMERIC(10,2) NOT NULL
);

CREATE TABLE orders (
    order_id SERIAL PRIMARY KEY,
    customer_id INT REFERENCES customers(customer_id),
    product_id INT REFERENCES products(product_id),
    status TEXT CHECK (status IN ('pending', 'shipped', 'cancelled')),
    order_date TIMESTAMP DEFAULT NOW()
);
""")
conn.commit()

# --- INSERT CUSTOMERS ---
customers = []
for _ in range(NUM_CUSTOMERS):
    name = fake.name()
    email = fake.unique.email()
    customers.append((name, email))

cur.executemany("INSERT INTO customers (full_name, email) VALUES (%s, %s)", customers)
conn.commit()

# --- INSERT PRODUCTS ---
categories = ['Electronics', 'Fitness', 'Home', 'Books', 'Toys']
products = []
for _ in range(NUM_PRODUCTS):
    name = fake.word().capitalize() + ' ' + fake.word().capitalize()
    category = random.choice(categories)
    price = round(random.uniform(5.0, 100.0), 2)
    products.append((name, category, price))

cur.executemany("INSERT INTO products (name, category, price) VALUES (%s, %s, %s)", products)
conn.commit()

# --- INSERT ORDERS ---
cur.execute("SELECT customer_id FROM customers")
customer_ids = [row[0] for row in cur.fetchall()]

cur.execute("SELECT product_id FROM products")
product_ids = [row[0] for row in cur.fetchall()]

statuses = ['pending', 'shipped', 'cancelled']
orders = []
for _ in range(NUM_ORDERS):
    customer_id = random.choice(customer_ids)
    product_id = random.choice(product_ids)
    status = random.choices(statuses, weights=[0.2, 0.7, 0.1])[0]
    order_date = fake.date_time_between(start_date="-90d", end_date="now")
    orders.append((customer_id, product_id, status, order_date))

cur.executemany("""
INSERT INTO orders (customer_id, product_id, status, order_date)
VALUES (%s, %s, %s, %s)
""", orders)
conn.commit()

print(f" Loaded {NUM_CUSTOMERS} customers, {NUM_PRODUCTS} products, {NUM_ORDERS} orders.")

cur.close()
conn.close()
Check your Postgres server to see if the data has loaded into your postgres database orders, customers and products table.
Step 2: Integrate Postgres to Snowflake using Matia
- Login to your Matia account and go to Integration and search for Postgres in Sources.
- Add the credentials for Postgres (username, password, hostname, port, database, replication slot, publication)
- Click on Next, and Add Snowflake as the destination and add the credentials as well and enable integration and run the sync.
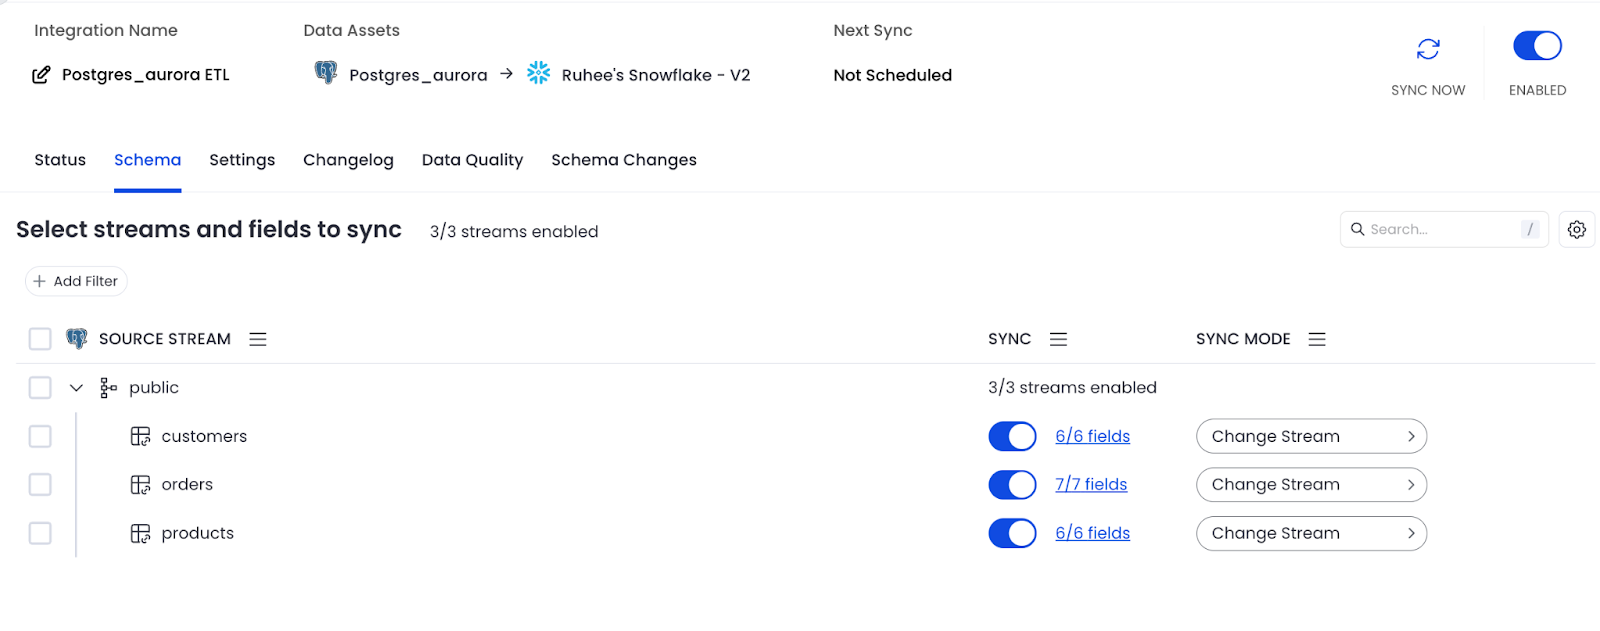
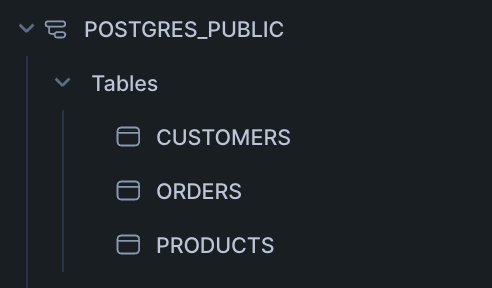
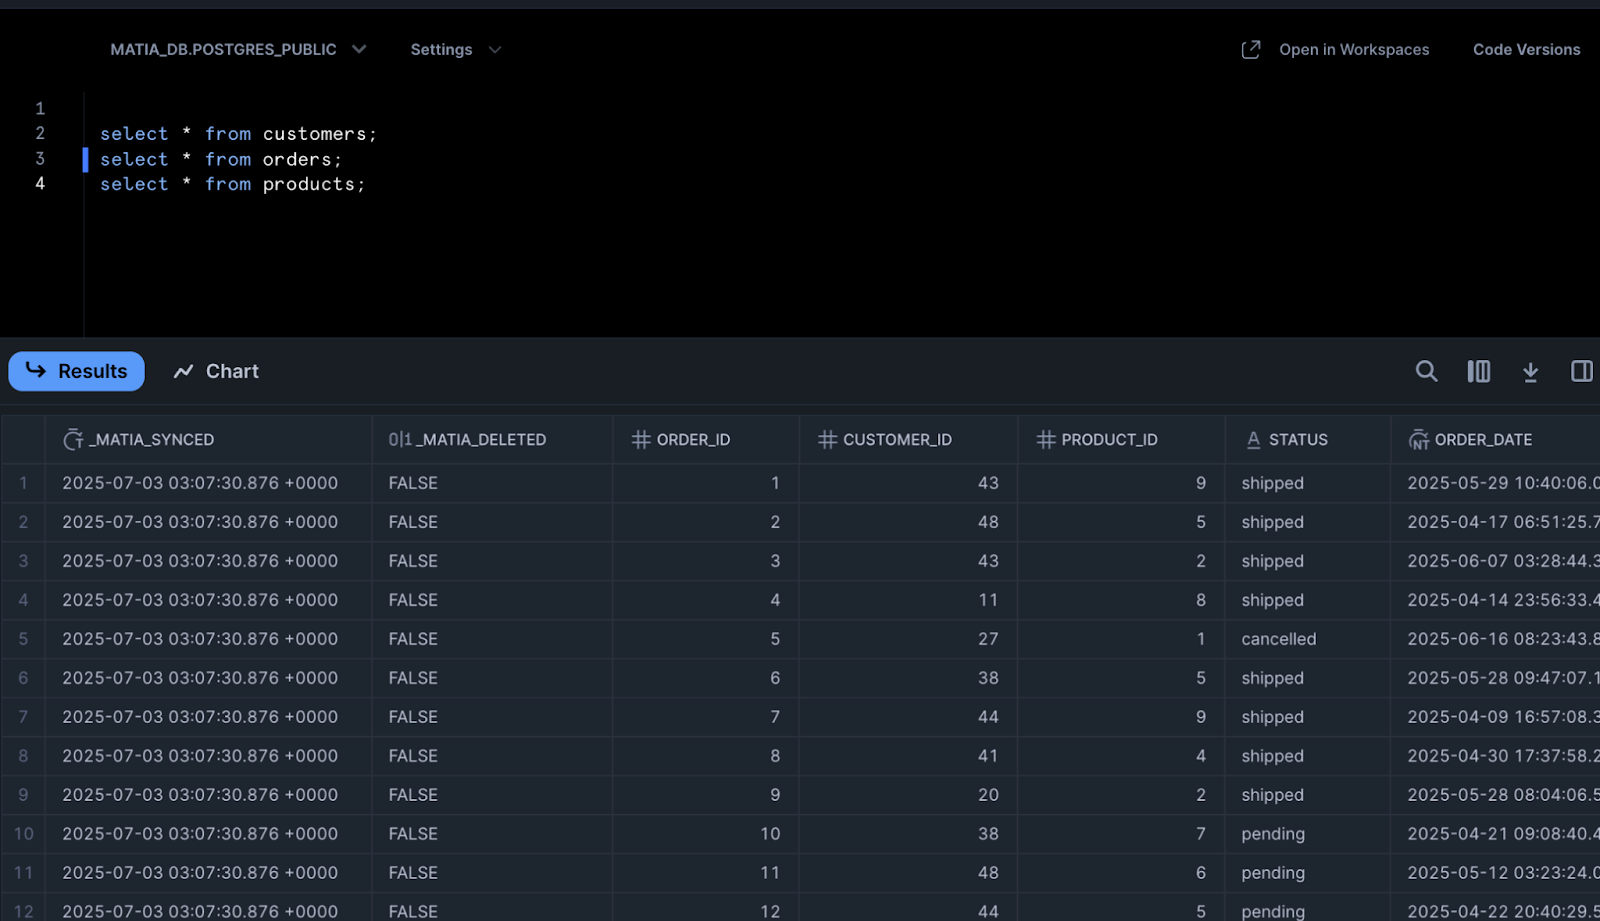
After the sync, The following tables will be available in your Snowflake environment:
Here is the MATIA_DB.POSTGRES_PUBLIC.ORDERS table:
Step 3: Write dbt models
Once you have initialized your dbt project (dbt init) and successfully connected dbt to Snowflake we can start writing data quality tests in the /models/ folder in the dbt project module installed from your local IDE or in your dbt cloud’s IDE:
Data Quality Tests - Staging
For the three tables: orders, customers and products we will be creating staging models and performing data quality tests such as checking for nulls, casting them to correct data types, and defining constraints such as primary, unique and foreign keys, and specifying relationships between tables using the ref() function to join tables together and create derived datasets on snowflake.
Below is the staging model for customers, where we cast fields to the correct data types and clean up inputs before running data quality tests.
stg_customers.sql:
with raw_customers as (
    select *
    from {{ source('postgres_public', 'customers') }}
)

select
    cast(customer_id as integer) as customer_id,
    initcap(trim(full_name)) as full_name,
    lower(trim(email)) as email,
    cast(created_at as timestamp) as created_at

from raw_customers
Next, here’s the staging model for products, which prepares product data for downstream testing by casting and cleaning key fields.
stg_products.sql:
with raw_products as (

    select *
    from {{ source('postgres_public', 'products') }}

)

select
    cast(product_id as integer) as product_id,
    initcap(trim(name)) as product_name,
    initcap(trim(category)) as category,
    cast(price as numeric(10,2)) as price

from raw_products
Finally, we stage the orders table by joining it with products, casting fields, and standardizing values. This prepares the dataset for relationship testing and further analysis.
stg_orders.sql:
with raw_orders as (
    select *
    from {{ source('postgres_public', 'orders') }}

),

products as (
    select * from {{ source('postgres_public', 'products') }}
)

select
    cast(o.order_id as integer) as order_id,
    cast(o.customer_id as integer) as customer_id,
    cast(o.product_id as integer) as product_id,
    lower(trim(o.status)) as status,
    cast(o.order_date as timestamp) as order_date,
    p.price as order_amount

from raw_orders o
left join products p
on o.product_id = p.product_id
Once staging models are ready, we define tests in schema.yml to ensure data quality. These tests validate uniqueness, nullability, and relationships across tables like orders, customers, and products.
schema.yml file:
In your schema.yml file in the models folder, you can create tests to ensure that order_id, customer_id, product_id is unique and not null, and define the relationship between orders and products to perform joins, and retrieve the order amount from the product price.
version: 2

sources:
  - name: postgres_public
    schema: postgres_public
    database: matia_db
    tables:
      - name: orders
      - name: customers
      - name: products

models:
  - name: stg_orders
    columns:
      - name: order_id
        description: "Primary key for orders"
        tests: [unique, not_null]
      - name: customer_id
        tests: [not_null]
      - name: product_id
        tests:
          - not_null
          - relationships:
              field: product_id
              to: ref('stg_products')

      - name: status
        description: "Status of the order"
        tests:
          - accepted_values:
              values: ['shipped', 'cancelled', 'pending']
      - name: order_amount
        description: "Price from product table"
        tests:
          - not_null

  - name: stg_customers
    columns:
      - name: customer_id
        tests: [unique, not_null]
      - name: email
        tests: [not_null]

  - name: stg_products
    columns:
      - name: product_id
        tests: [unique, not_null]
      - name: price
        tests:
          - not_null
Once the staging models are built, use dbt run to compile and execute them. You should see confirmation messages showing that all three views were created successfully.
Run dbt command:
If all the models run successfully, congratulations! You’re ready to move on to the next step.
After running the models, use dbt test to validate your data. These tests check for nulls, enforce uniqueness, and confirm relationships between tables.
Run dbt tests:
Results will be available in Snowflake
Data Marts - Advanced Metrics
Now, we’ll create a marts directory, and do advanced queries to observe metrics such as product performance, daily revenue, and customer lifetime value.
In the marts directory, you can create the following transformations.
First, we create a model to analyze product performance by joining order and product data. This helps us track total orders, revenue, and average order value per product.
dim_products_performance.sql
with orders as (
    select *
    from {{ ref('stg_orders') }}
    where status != 'cancelled'
),

products as (
    select *
    from {{ ref('stg_products') }}
)

select
    p.product_id,
    p.product_name,
    p.category,
    count(o.order_id) as total_orders,
    sum(o.order_amount) as total_revenue,
    round(avg(o.order_amount), 2) as avg_order_value

from products p
left join orders o
    on p.product_id = o.product_id
group by 1, 2, 3
Next, we calculate daily revenue metrics by aggregating orders by date. This gives us visibility into order volume and average value over time.
mart_daily_revenue.sql
with orders as (
    select *
    from {{ ref('stg_orders') }}
    where status != 'cancelled'
)

select
    date_trunc('day', order_date) as order_day,
    count(order_id) as order_count,
    sum(order_amount) as total_revenue,
    round(avg(order_amount), 2) as avg_order_value

from orders
group by 1
order by 1
Finally, we build a model to calculate customer lifetime value by aggregating order data for each customer, showing total spend, order frequency, and purchase history.
customers_lifetime_value.sql
with orders as (
    select *
    from {{ ref('stg_orders') }}
    where status != 'cancelled'
),

customers as (
    select *
    from {{ ref('stg_customers') }}
)

select
    c.customer_id,
    c.full_name,
    c.email,
    count(o.order_id) as total_orders,
    sum(o.order_amount) as lifetime_value,
    min(o.order_date) as first_order_date,
    max(o.order_date) as most_recent_order_date

from customers c
left join orders o
    on c.customer_id = o.customer_id
group by 1, 2, 3
With our data marts in place, we can now update the schema.yml file to define tests for these models—ensuring our metrics are accurate, complete, and trustworthy.
Here's the schema.yml file:
  - name: mart_daily_revenue
    columns:
      - name: order_day
        tests: [not_null]
      - name: total_revenue
        tests:
          - not_null
          - dbt_expectations.expect_column_values_to_be_between:
              min_value: 0

  - name: dim_product_performance
    columns:
      - name: product_id
        tests: [unique, not_null]
      - name: total_orders
        tests: [not_null]

  - name: customer_lifetime_value
    columns:
      - name: customer_id
        tests: [unique, not_null]
      - name: lifetime_value
        tests:
          - not_null
          - dbt_expectations.expect_column_values_to_be_between:
              min_value: 0
To run the tests, use the command: dbt test
If any tests fail, dbt will notify you and provide details.
Snapshot for Slowly Changing Dimension (SCD)
To implement a snapshot to track changes in the customer information over time (Slowly Changing Dimension Type 2), inside the snapshots folder, create customers_snapshot.sql:
-- snapshots/customers_snapshot.sql
{% snapshot customers_snapshot %}

    {{ config(
        target_schema='snapshots',
        unique_key='customer_id',
        strategy='check',
        check_cols=['first_name', 'last_name', 'email']
    ) }}

    SELECT * FROM {{ ref('raw_customers') }}

{% endsnapshot %}
This snapshot will track changes to the first_name, last_name, and email columns for each customer.
To capture the current state, use the command: dbt snapshot
Over time, this snapshot will record changes, allowing you to maintain a historical view of customer data.
Documentation & Lineage
Once your models and tests are in place, dbt makes it easy to generate documentation and visualize data lineage. This helps your team understand how data flows through the pipeline and where each model fits in the bigger picture.
Documentation - Run dbt docs generate to generate the documentation for your project. dbt introspects your project and your warehouse to generate a JSON file with rich documentation about your project.
Lineage Graph - Run dbt docs serve and click View Lineage Graph on the bottom right. You are also able to view column-level lineage directly within Matia’s catalog as well, which will provide deeper pipeline information and show your dbt transformations.
Here is the lineage graph in dbt:
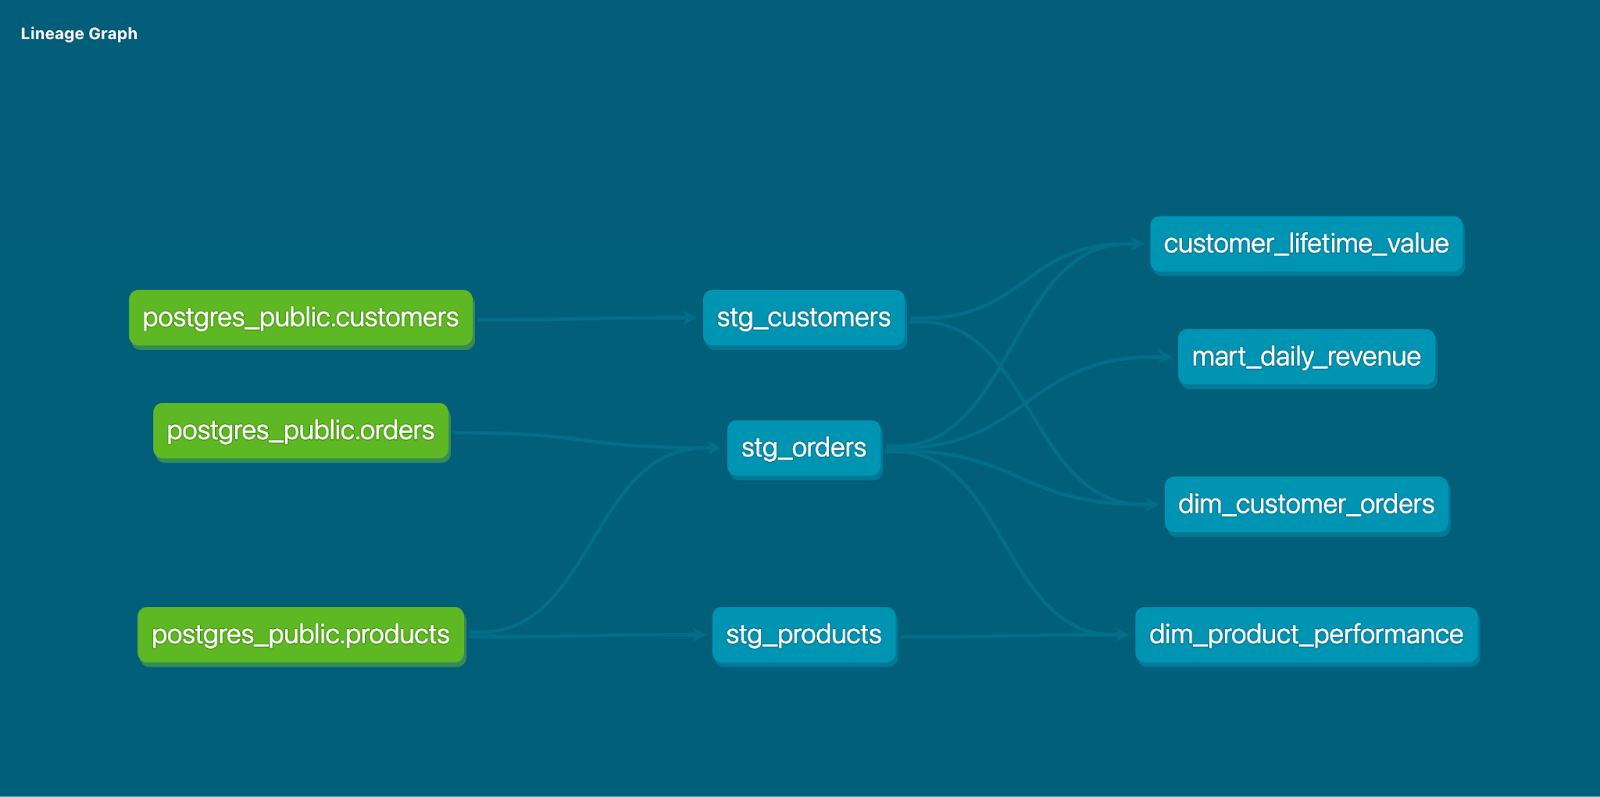
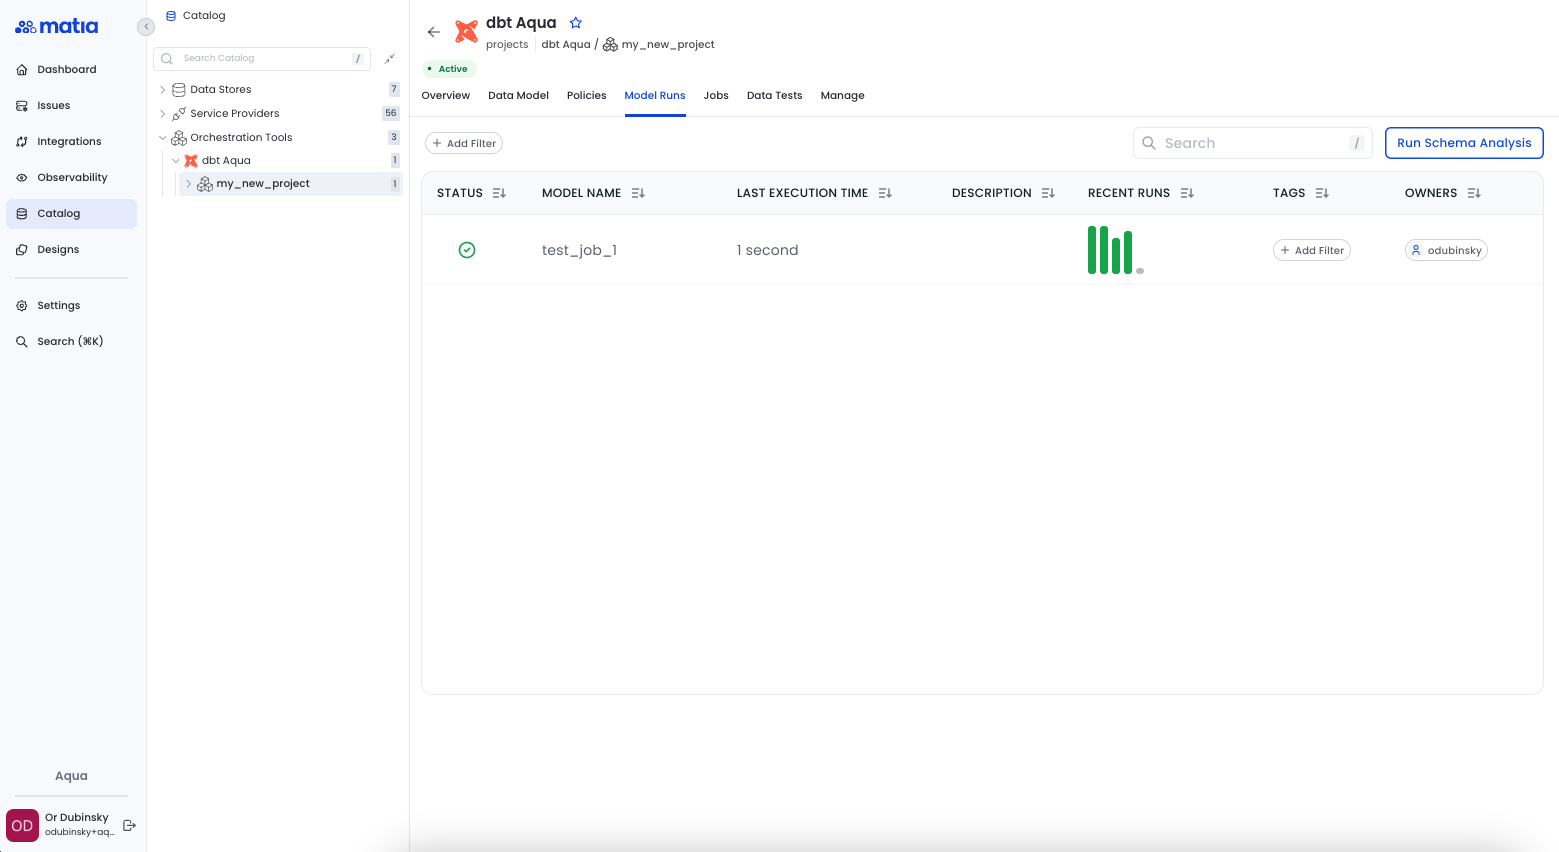
And here’s what lineage looks like in Matia. You can specifically see where dbt transformations take place.

Orchestration & triggering jobs
You can trigger jobs in dbt Cloud:
- Using GitHub: You can stage and commit your changes after running dbt run and dbt rest locally to validate. Dbt cloud will automatically detect the pull request and run a job if you’ve configured a PR job in the dbt cloud interface.
- Using dbt Cloud IDE - If you’re using the dbt cloud IDE instead of working locally: make changes directly into the Cloud IDE, and commit using the built in Git UI
- Trigger dbt jobs with Matia: After upstream events, such as data ingestion (e.g., Matia triggering dbt once data lands in the warehouse)
dbt pipeline best practices and troubleshooting
A well-structured dbt project not only ensures scalability and collaboration but also improves performance and cost-efficiency. Below are key best practices and common troubleshooting strategies for building and managing robust dbt pipelines in modern data platforms.
Naming conventions and project organization
Clear naming and modular structure help ensure consistency across models and ease of navigation.
Model Naming: Use prefixes like stg_, int_, fct_, dim_ to indicate the model’s role:
- stg_ – Stage: raw, cleaned data
- int_ – Intermediate: transformed logic
- fct_, dim_ – Facts & Dimensions for analytics
Use the following folder structure:
models/
  staging/
    source_system/
  intermediate/
  marts/
    core/
    marketing/
Performance optimization tips
Efficient dbt projects reduce warehouse computation and improve model runtime.
- Use incremental models for large tables to avoid full refreshes:
{{ config(materialized='incremental') }}- Leverage {{ ref() }} and {{ source() }} to track dependencies and optimize DAG execution.
Resource management & cost optimization
Running transformations in cloud warehouses like Snowflake or BigQuery incurs compute costs. Optimizing usage is key.
- Use ephemeral models for intermediate steps when you don’t need to materialize them.
{{ config(materialized='ephemeral') }}- Use --select and --exclude flags to avoid running unnecessary models:
Common real-world scenarios and solutions from dbt implementation
Real World Scenario #1: Siloed Data and Workflow Bottlenecks
In many organizations, business logic is scattered across teams and tools, leading to data silos and operational friction. Analysts often struggle to access data owned by other departments, relying on data engineers to build custom models or pipelines. This creates bottlenecks, delays reporting, and increases the risk of duplicated efforts—especially when similar models already exist elsewhere. As a result, insights become outdated by the time they're delivered, and trust in the data diminishes.
Solution: dbt Centralizes Logic and Empowers Analysts
dbt solves this by acting as a centralized repository for all data transformation logic. Instead of siloed scripts or undocumented processes, all logic lives in modular, version-controlled SQL models that can be easily accessed, reused, and extended across teams. Analysts with basic SQL skills can independently create and test models in their own development environments, without waiting on engineering. This streamlined workflow eliminates duplication, reduces delays, and enables true cross-functional collaboration—ensuring teams always work from a consistent, trusted layer of data.
Real World Scenario #2: Lack of Trust and Understanding in Dashboard Data
In many organizations, business users and analysts struggle to understand where the data in dashboards originates or how to interpret key metrics. This disconnect often stems from poor or fragmented documentation—scattered across Excel files or embedded in legacy ETL tools. Analysts waste time tracing data logic and can’t confidently explain discrepancies, leading to confusion and lost trust.
Solution: Centralized Documentation and Lineage with dbt
dbt embeds documentation directly into your transformation pipelines, ensuring all users understand where data comes from and how it's transformed. With dbt Docs, you can:
- Document sources, models, and business logic at each step.
- Visualize data lineage from raw sources to dashboards.
- Host documentation for self-service access (via dbt Cloud or internally).
- Align data teams and business users with a shared understanding.
This reduces confusion, builds trust, and accelerates insight delivery.
Real World Scenario #3: Data Pipeline Issues Are Discovered Too Late
A common and costly issue for many organizations is realizing too late that something has gone wrong in their data pipeline. Without automated testing and observability, problems like missing data, broken transformations, or source replication failures often go undetected until after reports are delivered or decisions are made. Setting up proactive monitoring and testing is essential—but building this from scratch can be time-consuming and complex.
Solution: dbt Testing and Native Observability Help Catch Issues Early
dbt makes proactive data quality testing simple and effective with built-in support for common tests like not null, unique, accepted values, and referential integrity. These tests are defined directly in YAML alongside your model documentation, making it easy to integrate quality checks into your workflow. For more complex needs, custom tests can be written using SQL and Jinja. dbt Cloud enhances this by providing automated notifications, alerting your team the moment something goes wrong.
For deeper monitoring, tools like Matia offer dbt-native observability. Without the need for additional platforms, Matia integrates directly with your dbt project to ingest test results, detect anomalies in freshness, volume, or schema, and provide guided setup for custom monitors. This extends dbt’s capabilities, allowing your team to quickly detect and resolve issues—before they impact downstream users.
Together, dbt and observability tools shift your team from reactive troubleshooting to proactive data reliability, improving trust and saving valuable time and resources.
How Matia’s dbt integration adds value
The Matia dbt integration provides complete visibility into your dbt models and jobs and their metadata.
Here are some of the capabilities we’ve outlined above
Bi-directional orchestration between Matia and dbt workflows
- Ingestion (ETL) to dbt: Trigger dbt jobs after Matia ingestion sync is completed
- dbt to Reverse ETL: Initiate Matia RETL jobs once dbt jobs finish running
The Model Discovery feature offers a comprehensive catalog of all dbt models and jobs, enabling users to easily navigate and explore their data assets. Additionally, it supports automated documentation synchronization, ensuring that any changes made to models are consistently reflected in the documentation, promoting transparency and efficient collaboration across teams.
Deep data liineage provides a visual representation of model dependencies within your dbt project, making it easy to understand how data flows through your pipeline. It is valuable for performing impact analysis, helping users assess the effect of upstream or downstream changes before they are implemented, ensuring smoother deployments and reducing the risk of breaking dependencies.
In the video above, you can also see that Matia includes a testing and validation capability thatensures the ongoing health of your dbt environment by providing real-time visibility into test execution and historical tracking of data test results. It offers detailed failure analysis to quickly pinpoint and resolve issues.
Conclusion
In this guide, we walked through how to build and orchestrate a modern ELT pipeline using dbt, integrated with tools like Matia and Snowflake. Starting from raw data ingestion (e.g., Postgres), through transformation in dbt, and ending with analytics-ready models, we demonstrated how dbt enables scalable, modular, and testable workflows using familiar SQL.
What we covered
- Setting up Postgres to Snowflake integration with Matia
- Connecting dbt to Snowflake
- Writing and organizing modular SQL models to stage tables, perform data quality checks, and build data marts that serve as curated layers that simplify complex raw data for downstream analytics and reporting.
- Orchestrating dbt jobs after ingestion to transform raw data into analytics-ready models—supporting both reporting and Reverse ETL workflows.
- Best practices for naming, performance, and cost management
Advanced dbt features to explore
- dbt Packages for reusable macros and models
- Snapshots for slowly changing dimensions (SCDs)
- dbt Semantic Layer (beta) for centralized metric definitions
- dbt Mesh for cross-team collaboration and model ownership
- Exposure tracking to link models to BI dashboards
- dbt artifacts, which drive the Discovery API and dbt Explorer, offer invaluable observability across all dbt projects, allowing teams to monitor performance, spot patterns, and detect problems across the organization.
Additional resources
Scaling with a modern data platform
As your data team and volume grow, consider:
- Warehouse compute scaling strategies (e.g., Snowflake auto-scaling)
- CI/CD integration for dbt model deployment
- Monitoring tools for lineage and job health (e.g., dbt Cloud, Matia)
- Organizing your project using a data mesh or domain-driven design approach
If you want to learn more about using dbt with Matia, check out more about Matia's dbt integration.

.png)